With Rolica, the two Vimeiro Scenarios and the full Vimeiro battle completed, the British participation in the Peninsular War moves on to the final campaign of 1808, culminating in Sir John Moore's retreat to Corunna and the first battle of 1809, when the British Army awaiting transport home to re-equip and rebuild the army that had ejected Junot from Portugal was forced to fight a rear guard action on the Monte Mero Heights above the harbour town by Marshal Soult, sent in pursuit by Napoleon.
This scenario captures the key event of this battle by focusing on Soult's principle attack, when at 13.45, French infantry of General Mermet's and cavalry of General Lahoussaye's divisions descended from the Penesquedo Heights and advanced on the British positions behind the town of Elvina, with a view to turning the right flank of Sir John Moore's army and cutting him off from the harbour behind.
The actual battle was pretty much over by 16.00, with the French driven back to their start lines as the dark winter evening set in, but with Sir John Moore mortally wounded and carried back by members of the 42nd Royal Highlanders, to die later that evening, knowing that the army was saved and the French beaten.
So our two modern day commanders were posed the challenge, "could the do better than either Sir John Moore or Marshal Nicolas Soult?" That is could the French take and control the heights above Elvina by turn 9, (16.00), or would the British prevent this and thus ensure their withdrawal to safety. The definition of control being, having more good order units on the Monte Mero Heights than the enemy at game end, with good order being identified as being able to advance on or charge the enemy.
With "Yours Truly" on the computer, the roles of Sir John Moore and Marshall Soult were taken by my two sons Tom and Will, with Will getting his first game of Carnage & Glory II (C&GII) up against his elder brother who is becoming very skilled at getting the best from his units under the system.
We started our game 24 hours later than planned, originally set up for Boxing Day, as Will was ill over Christmas, and so everything was set up and started at 9am. Tom placed his French units first in their assault positions as per the map, and then Will, defending set up his visible units, leaving the rest of his on table forces off and just placing "blinds" to indicate their position on the reverse slope.
 |
| The 50th (West Kent's) Foot look on in support of Bentick's Light battalion as it enters the outskirts of Elvina |
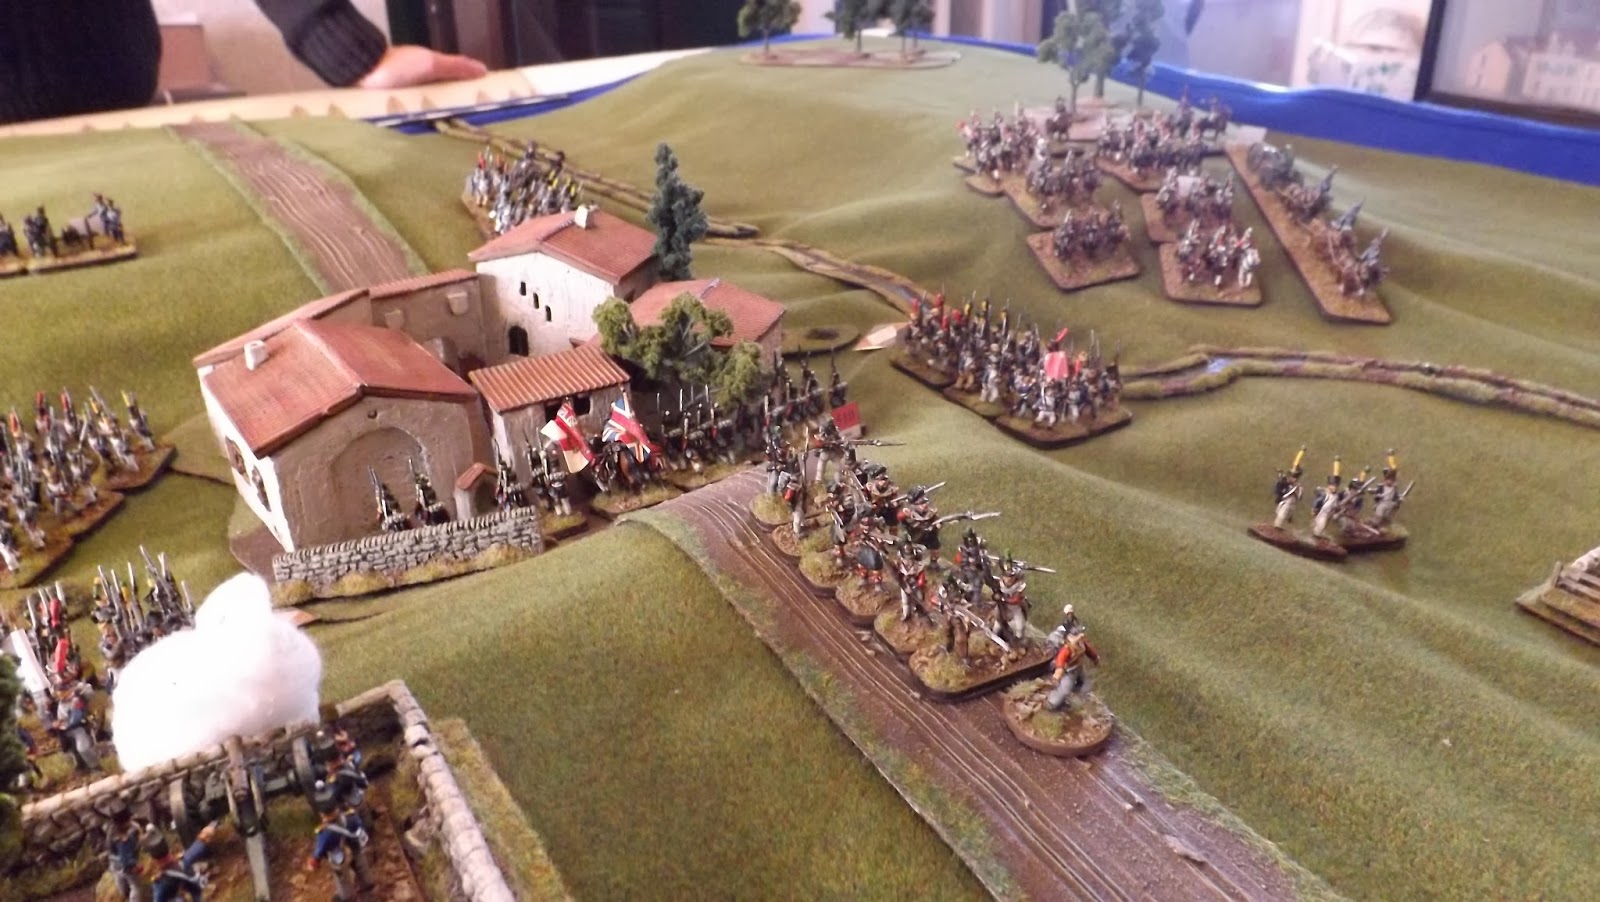
The first consideration for the British was what to do about Elvina, "to garrison or not to garrison? That is the question". The town, rather like Hougoumont Chateau at a later Anglo-French clash, forms a bastion on the extreme edge of the British ridge and left unoccupied for the French would allow them to use it for a jump off point to launch a major attack. It was not occupied initially, but was heavily contested during the battle. Thus Will placed the Light Battalion of Bentick's brigade at the outskirts of the town supported by the 50th West Kent's) Foot. It would be a race to occupy the town, especially if the French gained the initiative on turn one, and so the Light Bobs in open order would be able to move more quickly to secure the town prior to the 50th arriving in support. "
Note: A nice aspect of C&GII is that the system determines who has the option to move first in each turn, based on the comparative mental and physical fatigue, morale and physical strength of both armies. This overcomes quite a few of the issues of an IGOUGO system and a good deal of fun is generated in the determination of who has that initiative when it really matters such as in this situation".
 |
| With minimal British artillery available, Elvina would act as a formidable strong point on the British right flank |
 |
| General de Division Julien Augustin Joseph Mermet |
And so the Battle of Corunna 2013 commenced with the initiative going to the British and the town of Elvina being garrisoned by Red Coats. This was followed by Napoleon's Legions descending from the Penesquedo Heights in the four distinct command groups, with the three infantry brigades of General de Division Mermet, each of four battalions of the 47th and 122nd Ligne and the 31st Legere, and the dragoon brigade under General de Brigade Caulaincourt with two regiments each of two squadrons operating on the left bank of the Monelos River.
.jpg) |
| General de Brigade Auguste de Caulaincourt |
The cavalry brigade was only part of the dragoon division that operated on the French flank at Corunna. The game assumes that the rest of the division is further out on the flank and was engaged by the other brigade of General Paget's division. Our on table cavalry was tasked with finding a ford on the fast flowing Monelos River, with all that winter water flowing down from the mountains, and crossing over to flank the British ridge. This was not an easy task as the terrain, as in the actual battle, is very disruptive to cavalry, with lots of walls and broken ground to negotiate, and the ford would only be found by rolling a double on two average dice (electronic ones as this is a computer moderated game). The horse guns were not allowed to ford the Monelos but could fire in support across it.
 |
| The dragoons and horse artillery of General Lahoussaye's division advance on the left bank of the Monelos River |
As the French battalions descended into the valley you could almost imagine the din of the drums beating out the Pas de Charge. The French commander, Tom, has played a few games of C&GII and has used and is well aware of the strengths of a British Line and was quite keen to try out some new tactics with his French columns.
 |
| The four battalions of the 122nd Ligne under General Joseph Gaulois advancing on Elvina |
The French Ligne brigade of the 122nd Ligne headed down the road towards Elvina led by their commander General de Brigade Joseph-Yves Manigault-Gaulois.
 |
| General de Brigade Joseph-Yves Manigault-Gaulois |
The first clash occured as the 1/122 and the 4/122 Ligne charged into the outskirts of Elvina. to be met by withering fire from the British Light Bobs and both battalions quickly fell back. Round one to the British.
With the resistance in Elvina looking likely to be a "very hard nut to crack", Marshal Soult, conscious of the time constraints placed upon him, started to immediately recalculate.
 |
| The battalions of the 47th Ligne under General Simon Lefebvre (wounded in the battle) advance with the four battalions of the 31st Legere to their right under General Antoine Jardon |
Unwilling to give up on the first attempt, the 122nd Ligne tried again to force entry into Elvina, and despite causing horrendous casualties on the Light Bobs were again repulsed and the Light Bobs were replaced by the 50th Foot as the former fell back from the town, a broken unit.
 |
| The French foot artillery of twelve medium cannon would be busy firing from the Penesquedo Ridge |
Following this second failed attempt to take Elvina, the 122nd moved into the valley in support of their colleagues in the 47th Ligne as they began to climb the forward slopes of the Monte Mero Heights, leaving Elvina to be dealt with by the French battery now deployed on the forward slope of the Penesquedo Heights. The 50th foot would now be subjected to a barrage of 8lbr round shot and howitzer shells for the rest of the afternoon.
 |
| General Jardon (105) leads his Legere into the valley |
 |
| The French advance on a seemingly empty ridge |
It was the 47th Ligne that was the first French infantry to make contact with the British main line, as their lead battalions trudged up the forward slope towards a small enclosure behind Elvina, occupied by two Royal Artillery 6lbr guns. The Royal Artillery gunners were in an unenviable position as like their colleagues in the cavalry, who were now safely ensconced on the transports in the harbour, they had had to destroy their horses and thus they were unable to limber. Only a few guns were available to the British rear guard, with most of their pieces now aboard ship. Thus it was that only two 6lbr guns were on the slope to contest the French attack.
However in the best tradition of the Royal Artillery
(All my family were Gunners) the first French battalion to charge their bastion was met by a blast of close range canister as the 50 man detachment stood to their guns and saw off this first attack.
 |
| With their skirmish line to the fore, the 31st Legere beat out the Pas de Charge |
The 47th Ligne however were not going to allow this puny force to stand in the way for long, and a second battalion charged in from the side forcing the gunners to fight for the wall in hand to hand combat as they struggled to manhandle one of their guns back towards the British line.
 |
| The 50th foot move into Elvina to support the Light Bobs in their struggle with the 122nd Ligne |
 |
| The dragoons and horse artillery on the French left flank find the terrain hard going for mounted units and make slow progress |
 |
| The Royal Artillery lend their support to the defenders in Elvina |
As the 47th Ligne was battling with the British gunners, the 31st Legere methodically made its way towards the centre of the British position. They were led by a hard bitten veteran commander General de Brigade Henri- Antoine Jardon.
The 31st Legere, considered themselves as the point of this French spear tip and were a cut above their colleagues in the Ligne battalions. They also had a few tricks up their sleeve when it came to dealing with the Rostbeefs hiding behind their ridge line.
 |
| General de Brigade Henri- Antoine Jardon. |
 |
| The 31st Legere begin the climb onto the British ridge |
 |
| The Light Bobs repulse both initial attacks by the French but take casualties in the process |
 |
| Hand to Hand fighting in Elvina as General de Division Mermet looks on, and French artillery deploy |
 |
| The French force looks unstoppable as General Mermet oversees his disposition |
The approach of the 31st Legere was met by General Coote Manningham's Light Bobs deployed slightly ahead of a small grove of trees atop the ridge. The British general was a character in his own right and as well as being a humanitarian ahead of his time, like Sir John Moore, was an early exponent of Light Infantry tactics and a founder of the 95th Rifles
 |
| Major General Coote Mannigham |
 |
| As the French battalions crest the ridge they encounter more brigade light bobs thrown forward in open order |
The French infantry were arriving on the ridge en masse and, as well as deploying the brigades in situ to meet this threat, the British commander felt compelled to call forward his reserve brigade, the Guards.
It was at this point that the experience of our French commander (Tom) and lack of experience of our British commander (Will) came into play, and as Dad, I felt compelled to offer Will some advice. The French Legere in particular were well spaced and approached the British position with great care, resisting the temptation to drive off the British Light Bobs with an ill judged charge, knowing they would simply evade back behind their supports and the French would get a close range surprise volley for their trouble.
 |
| The Royal Artillery (top right) throw back the first assault on their position, being without limbers they must fight in position |
As the French infantry edged forward, Will deployed his Line Infantry to meet the threat. With all this opposing infantry at close quarters, the tension was palpable, and Will was toying with the idea of opening fire at around 150 paces. It was at this stage that I advised Will to wait, as Tom knew perfectly well that this would be ill judged and was what he was waiting for.
 |
| Another French attack goes in against the Elvina garrison |
 |
| Marshal Soult (101), left foreground, encourages the 2/122nd Ligne to support the advance up the slope ahead |
 |
| The French are still uncertain as to exactly where the British brigades are positioned and in what strength. |
 |
| Bentick's brigade light battalion pull out from Elvina badly shaken after their struggle in the town, leaving the 50th Foot to continue the struggle alone |
As Dad had now gone and tipped his younger brother off about what was going on, Tom now deployed his next manoeuvre, namely to shake the Legere out into L'Ordre Mixte with the centre battalion forming line between the two outer columns, whilst keeping his fourth battalion in column to the right rear flank ready to take advantage of a faltering British line during the fire fight.
I told you that Legere regiment was well spaced, and that Tom is learning and getting better with every game we play.
 |
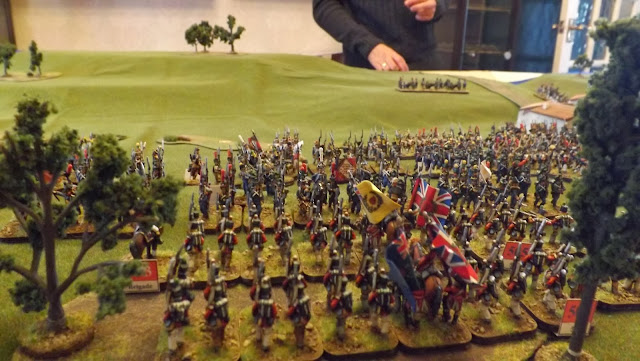
| The French encounter a line of Redcoats as the irresistible force meets the immovable object |
The challenge from Tom's Legere was obvious. He was not simply going to charge forward in column, but was going to use a Montgomery crumbling attack by forcing the British into a fire fight and then hitting them with a reserve column, clever stuff.
 |
| General Coote Manningham (503) encourages the 1/26th (Cameron's) Foot, supported by the 3/1st (Royal Scots) as the first crashing volleys ring out |
Will turned to me for advice, and I, acting as Sir David Baird, suggested that if the French want to try and take on the British in a musketry duel then it would be rude not to take up the challenge, pointing out that he would have to advance to close the range, but that he would still have some cover from the light wood. It would then come down to who could shoot the best and whose morale could stand the casualties. Will took the advice, advanced his line and fired.
 |
| The 1/4th (King's Own) Foot, encouraged by Sir John Moore, advance to support the Royal Artillery gunners resisting bravely to their front |
The volley from the 1/26th(Cameron's)Foot was devastating and the 1/31st Legere seemed to reel as 96 of their number dropped, in reply they manged to drop 46 of the Cameron's, "game on". In two rounds of firing the Legere lost 140 of their number and broke to the rear.
 |
| Major General Lord William Bentinck |
To try and take the pressure off, the French brought forward the 47th and 122nd Ligne, and they went forward in column. The British brigade under Lord William Bentinck was under pressure, having detached its Light battalion and the 50th foot to defend Elvina it was relying on the 1/42nd(Royal Highland)Foot and the 1/4th(King's Own)Foot to hold the line, waiting for support from the Guards brigade. This was an opportunity for the French to break the line before the Guards arrived.
 |
| Lieutenant General Sir David Baird |
The fight here became desperate as the Royal Artillery was overcome and the Infantry began to open fire on the French columns with devastating effect. However Sir David Baird whilst attempting to rally the RA gunners was unhorsed and captured. In return, General de Brigade Lefebvre was shot and lightly wounded, encouraging his men on his return with the sight of his blood stained shirt
(C&GII adds a lot of flavour to the game by providing reports throughout about events that can impact the armies involved).
 |
| The French guns batter the 50th foot in Elvina |
Then with three turns of the game remaining, the French received some good news. The 18th Dragoons had discovered a ford on the Monelos River and General de Division La Houssaye was directing his men across. Would they be over in time to support the attack?
_Col.jpg) |
| General de Division Armand Lebrun de La Houssaye |
 |
| The 17th and 18th Dragoons search the banks of the Monelos for a ford to lend their support to the attack |
 |
| Tom having fought the British in previous encounters changes the 31st Legere into Order Mix as he engages Manningham's brigade on the heights. |
 |
| And still the gunners fight on |
 |
| The fight on the ridge develops into a fire fight as the French resist the initial urge to charge in and look to degrade the British line before closing - but would it work? |
 |
| The British lines firm and steady start to shoot fast and accurately as the French battalions start to wilt under the barrage |
 |
| French columns feel out the flank of Manningham's brigade to support the musketry battle. General Jardon (105) joins his lead battalion as does General Manningham opposite. |
 |
| Still the dragoons search for that elusive ford, as the horse guns try to lend a hand |
 |
| Major General Sir Henry Warde |
As the French cavalry prepared to move across the ford, the Guards brigade under Major General Sir Henry Warde moved forward to support Bentick's hard pressed brigade. In desperation the French horse guns on the Monelos opened fire at long range, but the Guards simply closed ranks and moved forward without breaking step.
 |
| The last thing the French needed to see was General Warde and the two battalions of the First Guards deploy onto the heights |
 |
| Sir John Moore is unable to prevent Bentinck's Light Battalion from leaving the battle |
 |
| The French Horse Guns start to find targets, but the range is long |
 |
| Suddenly the French Legere in the centre break , was this the beginning of the end? |
 |
| "The Guards will advance" |
 |
| The French gunners kept at it all afternoon as the snow began to fall |
With two moves remaining the forces on both sides were becoming desperately tired and units in the front lines were starting to waver under the stress and the firing becoming sporadic and ineffectual. It is at this time that the side with the reserve intact can make its presence felt, and the British had that force in hand with the arrival of Disney's brigade, led forward by the very capable Sir Edward Paget.
 |
| Major General The Hon. Sir Edward Paget |
(C&GII allows the setting up of reserve and flank force arrivals which can be randomised to add an element of uncertainty to the game. General Paget's force was set up as a flank force marching from the outskirts of Corunna when summoned by Sir John Moore at the start of the battle).
 |
| General Paget leads on General Disney's brigade suffering skirmish fire from French Dragoons as they advance in line to support the British right flank. The time is 15.00 |
 |
| The battle is too close to call as both sides have units breaking and falling back from the front line. French units can be seen falling back in the valley and British commanders are struggling to keep their battalions on table top right. French Dragoons have finally forded the Monelos and are approaching the ridge. Time 15.30 |
 |
| The battalions of the 31st Legere falling back and trying to regroup in the valley |
 |
| Sir John Moore and his staff act as a back stop as they look to keep their men in the fight |
As the battle started to break down, both sides began to focus on the victory conditions and the need to drive enemy units off the ridge whilst keeping their own in play and in good order. Both Soult and Moore were kept busy riding from stress point to stress point helping to rally and cajole their units for one more effort.
These moves by the commanders often meant them having to attach to units in the front line and running the risk of ending up a casualty themselves, and it was in the penultimate turn, Marshal Soult was seen to fall from his horse under the muskets of the 42nd Highlanders, badly wounded by a ball in the shoulder, forcing him from the field of battle.
 |
| Marshal Soult encourages his men for one more attack just before falling badly wounded having been shot in the arm |
 |
| Sir John Moore was everywhere along his lines in the final stages of the battle |
The retirement of their commander seem to herald a general retreat as multiple French battalions tumbled back down the ridge interpenetrating friends as they went, heedless of calls to reform and regroup.
The game at an end it was time to count the cost and tally up the points.
 |
| And then it was all over, the French fell back, exhausted, the British looked on with equal fatigue, but they held the ridge with eight steady units to six in their favour |
We had played from 9am to about 6pm with a break for lunch, and the final picture of Tom and Will shaking hands shows a dark hallway in the background, as opposed to the morning light shinning in on the first pictures.
The battle had gone right to the wire and both armies were exhausted, but on the final count of steady units still on the Monte Mero Heights at game end, the British had it by an advantage of two units.
 |
| A really good game that was too close to call right to the end |
The butchers bill for the game shows the intensity of the fire fight that developed on the ridge, with both sides, pouring it on. The number of General Officers wounded and captured also shows the intensity of the battle as commanders attached themselves in critical fights. Battle honours went to the 26th(Cameron's) Foot, who just didn't know when they were beat, and the 4/122nd Ligne who could take it and dish it out in good measure.
W denotes No Advance
R denotes Halt or Retire
Y denotes Routing
D denotes Dispersed or removed from the field

The files, briefing and unit labels are now available to download from "My Scenarios" if you want to play Corunna. If you do, let me know how it goes.
So the British Leopard was able to withdraw back to "Blighty" to be re-equipped and sent to it's destruction in the Walcheren debacle. However Sir Arthur Wellesley will be back in 2014, ready to avenge Sir John Moore and his army at the Battle of Oporto and his famous crossing of the Douro.
This game is dedicated to and in memory of Fergus "Gus" Murchie


-january-17th-1809,-from-'the-martial-achievements-of-great-britain-and-her-allies-from-1799-.jpg)


_Col.jpg)


